This Homemade Funfetti Cake has soft, sprinkle filled cake layers that are finished with a delicious, sweet buttercream frosting. This cake is the perfect birthday or celebration cake!

Funfetti Cake
I’m pretty sure 99% of people think that Funfetti boxed cake mix is one of the greatest things ever created. I am married to one of the 1% who disagree with that statement. But me, I love it. In college, Funfetti cake was the go-to cake that my friends and I made for everything. I even remember eating the mix out of the box with a spoon (note: I’m pretty sure that’s one of those things you’re not supposed to do now – you know, the whole raw flour thing).

Homemade Funfetti Cake
A few years ago my friend asked me to make a funfetti cake for a shower she was throwing. I made a recipe I found online, and was totally underwhelmed. I ended up buying a boxed mix instead. That day I thought, “I don’t understand why anyone would try to make this when the box is so dang good!” And then I decided that I wanted to give it a shot.
The Development of My Funfetti Cake
After that shower, I made my own versions of funfetti cake many, many times. Every time a friend asked me to make a cake for a event and didn’t have a preference of flavor, I made funfetti. They were all fine, but none hit the mark of what I was aiming for … I had one that was too dry, one that was too gooey, one too sweet, etc, etc. Finally, for my daughter’s birthday, I got what I was looking for!
This Homemade Funfetti Cake does not taste exactly like the boxed mix, which is good, because that was not my goal. My goal was to have a homemade version that I liked as well! This cake is soft, sweet, and filled with plenty of sprinkles! It’s a great celebration cake for any occasion!

Frosting Notes
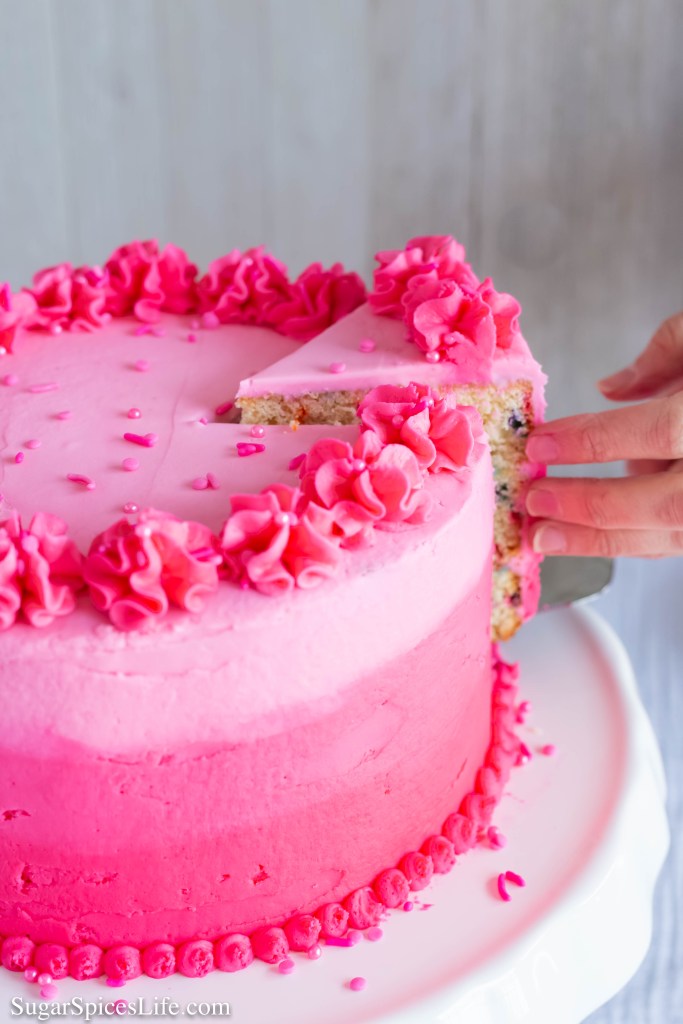
For this cake, I did an ombre pink frosting with blue filling. To achieve this look I first removed about 2/3 cup of the white frosting and used Wilton Royal Blue gel icing color to dye it blue. I then used Wilton Pink gel icing color to dye all of the remaining frosting light pink.
After the frosting was a light pink in color, I removed about 2 cups of it from the mixing bowl and set it aside. I then added more of the pink gel icing until the frosting was a medium pink. Once the color I wanted was achieved, I removed about 2/3 cup of the colored frosting and set it aside. I then used more pink gel icing to make the frosting a deep pink.

To decorate the cake, I first used the lightest pink frosting to pipe a barrier around each layer. I filled the center with blue. I then used the lightest pink frosting to thinly coat the entire outside and top of the cake.
Next, I used a Wilton tip 12 (links to the tip set and bags I use are at end of post) to pipe lines of color around the cake. I started with the darkest pink at the bottom and made lines around until I reached the middle. I then used the medium pink color. For the top layer and top of cake, I used the lightest pink frosting. I then smoothed the frosted surfaces with the Azteco frosting smoother. If you want a video, there are many videos on YouTube of ombre frosting.
For the border on the bottom of the cake, I used the Wilton tip 12 to pipe small dots. I then used the Wilton tip 2D to pipe the design on the top of the cake.


Homemade Funfetti Cake
Ingredients
Cake
- 1 cup unsalted butter softened
- 2 cups sugar
- 1/2 cup light brown sugar
- 5 large eggs
- 2 teaspoons vanilla extract
- 3 cups all purpose flour
- 2 tbsp corn starch
- 2 teaspoons baking powder
- 1/4 teaspoon salt
- 1 cup buttermilk
- 1 cup candy sprinkles
Frosting
- 3/4 cup unsalted butter softened
- 3/4 cup all vegetable shortening
- pinch salt
- 1 tbsp vanilla extract
- 3-4 tbsp heavy cream or milk
- 5-6 cups powdered sugar
- gel food coloring if desired
- extra sprinkles for decor if desired
Instructions
Cake
- Preheat oven to 350 degrees. Line 3, 8″ round baking pans with parchment paper. Butter and flour pans (I use Baking PAM for this).
- Use electric mixer with paddle attachment to beat butter, sugar and brown sugar, until lightened in color and it has a fluffy appearance, about 1.5 minutes.
- Add eggs, one at a time, scraping down sides as needed, until well incorporated. Next, beat in vanilla extract.
- In a medium sized bowl, stir together flour, corn starch, baking powder, and salt. Alternate beating flour mixture and buttermilk into butter mixture, in about 3-4 additions. Start and end with flour mixture. Scrape down sides with spatula as needed.
- Stir in sprinkles.
- Evenly divide batter among the 3 prepared pans. Bake until tops are golden brown and a toothpick inserted into center of cake comes out with just a few crumbs, about 28-32 minutes.
- Let cook in pans for about 10 minutes, then transfer to cooling rack to cool completely before assembling.
Assembly
- Level cakes with a serrated knife or cake leveler.
- Use electric mix to beat butter and shortening until lightened in color, and very smooth, about 2-3 minutes. Next beat in salt and vanilla extract.
- Add powdered sugar, about 1/2 cup at a time. Beat until well combined, about 30 seconds. After each 1 – 1.5 cups of powdered sugar has been added, beat in about 1 tbsp of cream or milk. Do this until you reach your desired taste and consistency. If you prefer a more firm buttercream, you’ll use more powdered sugar and less milk, and vice versa if you want a softer buttercream. NOTE: More firm buttercream works well for piping. I generally prefer 5 cups of powdered sugar and 4 tbsp of whipping cream.
- Use buttercream to fill inside of cake. Stack cakes, with the leveled side down for the top layer. Apply a thin layer around entire cake which will serve as the crumb layer. Decorate as desired (see text above for details about how I decorated the cake in these photos).
Disclaimer: All nutritional information provided on this website is an estimate only and is not guaranteed.

If you enjoyed this Homemade Funfetti Cake, you might like these other SugarSpicesLife recipes:
Chocolate Chip Cookie Cake
Churro Cake
Lemon Strawberry Cake
Nutella Mousse Cake
Vanilla Cake with Chocolate Buttercream
Photos are links to items used to make this recipe:


